

Here’s a quick recap of the 8 steps you should follow during the planning stages of your website refresh:
- Identify what’s wrong with your current website (so you can focus on what to fix!)
- Define your goals for the new website
- Analyze your competition’s website(s)
- Fully document your current site (including pages, content, meta data, blog posts, videos, etc.)
- Map out your new site’s navigation
- Create wireframe mockups of the new design
- Refresh and update your content
- Make an action plan
If you’ve been totally on top of things and have followed all of the steps listed above during your planning phase, then you’ve already made excellent progress and only need to put together the final pieces of the redesign puzzle.
1. Create a 301 Redirect Map
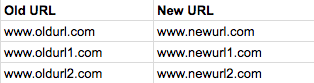
If your new site will have replacement pages or a new URL structure, you need to create a 301 redirect strategy to prevent your visitors from receiving the dreaded “Page Not Found” error. In step #4 above, you should have already documented your current website, including all of its pages and their URLs. Use the same data to create your 301 redirect mapping to your new URL or URL structure:
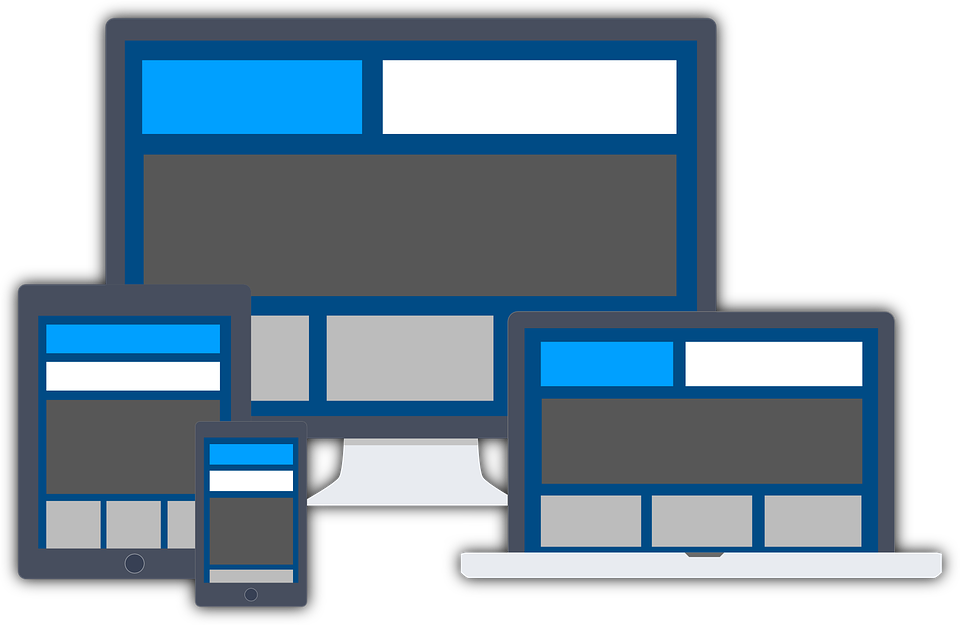
2. Check Resolutions
Check your new site in different resolutions. Are you mobile optimized for both android and iOS devices? Run Google’s Mobile-Friendly test to double-check. Also check your page across different operating systems, and make sure it looks good no matter what resolution is being used.
What about different web browsers, like Chrome, Internet Explorer, Safari or Firefox? Can you view your website properly across all browser, and all devices using those browsers? Test it on your iPhone, Android, iPad and desktop.
3. Test Your Links
Run a test on your site using a tool like Screaming Frog, which will crawl your websites’ URLs to find broken links (404s) and server errors. You can even bulk export the errors and source URLs to fix, or send directly to your web developer.
Another often overlooked test is on your social media icons. Click on all of them on every page they are listed to make sure they actually link to the correct website (and that your Twitter icon isn’t going to your Facebook page, or vice versa!)
4. Test Your Speed
Pingdom is another tool you can use to test the loading times and speed of your site, and locate any bottlenecks. This will help you understand what is causing it to slow down, and how you can fix it before you launch.
5. Consistency is Key
Double check all of your design elements like font, font size, image size, image placement, blank spaces and alignment and make sure they are consistent and in line with the overall design of your website. Accidentally having different font in two spots on the same page can make your site look unprofessional or sloppy, so although this step takes time and a detailed eye, it’s an important piece to review.
6. Test Forms
Do a functionality test of all forms on your website, and make sure they work the way they are supposed to. Is a Thank You page generated immediately upon submission of the form? Is an email to the user generated immediately upon submission of the form? Are you receiving an email of all of the correct details entered into the form?
7. Meta Data
Although this was part of your planning checklist, double check all of your meta data and make sure nothing is missing, and that your titles and descriptions are within the character count. Titles cut off after ~67 characters and and descriptions cut off after ~155 characters. If you’re using WordPress for your new website, then download the SEO plugin from Yoast, which will really help you with this.
8. Optimize Images
Review all of your images and make sure they contain alt tags, which are what Search Engines use to understand what an image is displaying. You can also enlist Screaming Frog to help with this.
9. Test Favicon
Favicons are the little website icons that display on the top left tab of your web browser, which show a graphical representation of which website is being visited.
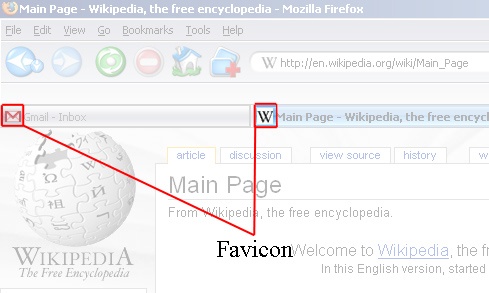
If you use a Favicon, make sure to test it in every browser to make sure it’s displaying correctly.
10. XML Sitemap
Finalize your new XML sitemap and submit all versions of your site in Google Search Console. You also need to add the sitemap to your robots.txt.
11. Tracking Code
Make sure your Google Analytics code is added to your new site header, and other tracking codes, like ones used for Adwords or Facebook Ads are installed, and test that they are tracking properly.
12. Audit Plugins
If you have added, removed or changed any plugins from your new site, make sure they are working as you expect them. If you removed any plugins as part of your redesign, make sure they have actually been deleted from your site.
13. Test, Test, Test!
Play around with every link, every tab, every image, video, landing page or form across your new website. You should also ask anyone who will listen to you to test out your website. Fresh eyes always find something.
14. Promote and Celebrate Your Relaunch
Once you’ve worked out all the kinks and tested the heck out of your new website, celebrate your hard work by promoting your fabulous relaunch. Share it on social media and announce it in a blog post or email campaign.
15. Continue to Check Analytics
After your site is live, it’s SO important to keep a close eye on your Analytics so that you can immediately notice if there are any declines in web traffic, or improvements. Compare different pre-launch and post-launch metrics like sessions, time on site, and bounce rate per page. Any dramatic changes might tell you of an issue that you should fix ASAP.
You should also continue to work closely with your Google Search Console account and stay on top of any HTML errors or crawl errors so that you can fix them with edits or redirects right away.
—
Best of luck to you in your website redesign and relaunch! If you think we’ve missed anything in this launch checklist, please let us know in the comments below.

![How to Ensure A Successful Web Redesign Procurement / RFP Process [Video]](https://umamimarketing.com/wp-content/uploads/2017/10/How-to-Manage-the-Procurement-Process-for-a-Website-Redesign-Umami-Marketing-720x341.jpg)
![What You Need to Understand About Responsive Web Design [Video]](https://umamimarketing.com/wp-content/uploads/2017/10/What-to-Understand-About-Responsive-Web-Design-Umami-Marketing-720x341.jpg)